
Full SIP & Smart Home Integration
INHALTSVERZEICHNIS:
-
- Baudisch.DualCom SIP & Smart Home Integration
1.1. Übersicht Schematische Darstellung
1.2. Kompatible Firmwareversionen
1.3. Kompatible Hardware von Baudisch - Konfiguration des SIP-Türmoduls oder SIP-Relaismoduls
2.1. Einstellungen Quickstart
2.2. Einstellungen Rufziele2.2.1. Ausgehende Anrufe
2.2.2. Ankommende Anrufe2.3. Einstellungen Experten Konfiguration
2.3.1. Sonderfall: Externe Sprachverbindung über die Loxoe App
2.3.1.1. Aufbau einer Sprachverbindung zu einem sich extern befindlichen Mobiltelefon
2.3.1.2. Anschauungsbeispiel für eine Sprachverbindung zu einem externen Mobiltelefon2.3.2. (Optional) Kommunikation mit mehreren Miniservern und/oder PC‘s
- Optionale Konfigurationsmöglichkeiten
3.1. Zuordnung der Ruftasten mit Loxone Config
3.2. Testen der Konfiguration mit SIP-Remote Control
3.3. Fernsteuern eines Baudisch Moduls mit der Loxone-App - Hinweise und Support
- Anhang
5.1. Upgrade einer Loxone Intercom
5.2. Kompatible Hardware von Loxone
- Baudisch.DualCom SIP & Smart Home Integration
1. BAUDISCH.DUALCOM SIP & SMART HOME INTEGRATION
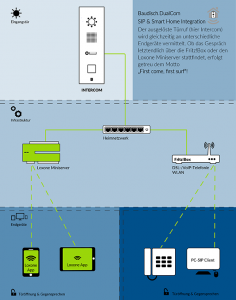
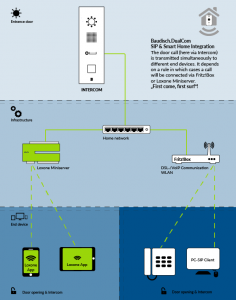
1.1. ÜBERSICHT SCHEMATISCHE DARSTELLUNG
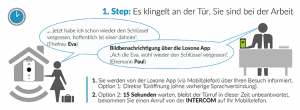
![]() Dank unserem neuen Baudisch.DualCom Feature, ist es ab sofort möglich, den Türruf und
Dank unserem neuen Baudisch.DualCom Feature, ist es ab sofort möglich, den Türruf und
das Videobild sowohl über einen Loxone Miniserver an die Loxone App,
sowie über einen SIP-Server, wie beispielsweise der Fritz!Box an Telefongeräte zu vermitteln.
![]() Die Intercom sendet den Türruf in das Heim-Netzwerk. Dort vermitteln die Fritz!Box und der Loxone Miniserver
Die Intercom sendet den Türruf in das Heim-Netzwerk. Dort vermitteln die Fritz!Box und der Loxone Miniserver
das Signal und Videobild an die jeweiligen Endgeräte. Somit lässt sich der Türruf überall entgegennehmen,
unabhängig davon, ob diese über den Loxone Miniserver oder die Fritz!Box angebunden sind.
![]() Das gilt auch für Mobilgeräte. Mit dem eingehenden Türruf aktiviert sich in der Loxone App das Videobild inklusive Ton.
Das gilt auch für Mobilgeräte. Mit dem eingehenden Türruf aktiviert sich in der Loxone App das Videobild inklusive Ton.
An den Endgeräten ist es Ihnen möglich, mit Ihrem Besucher zu kommunizieren und per Knopfdruck die Tür zu öffnen.
![]() Unser Video zeigt Ihnen, wie einfach das Baudisch.DualCom Feature funktioniert. Video
Unser Video zeigt Ihnen, wie einfach das Baudisch.DualCom Feature funktioniert. Video
1.2. KOMPATIBLE FIRMWAREVERSIONEN
Dieses Dokument bezieht sich auf alle Varianten des SIP-Türmoduls und SIP-Relaismoduls ab der Baudisch-Firmware V8.6/ (genaue Version variiert je nach Produkt). Falls Sie eine ältere Firmware verwenden, müssen Sie zuerst ein Update auf die aktuelle Version durchführen. Eine Anleitung dafür finden Sie hier.
Kompatibel sind folgende Versionen:
- SIP-Türmodul Plus ab Firmware V8.6/3.6 Loxone Ready.
- SIP-Türmodul ECO | Maxi ab Firmware V8.6/4.3 Loxone Ready.
- SIP-Relaismodul ECO | Maxi ab Firmware V8.6/1.3 Loxone Ready.
Des Weiteren ist mindestens die Loxone Miniserver Firmware 8.0.7.19 und die Version 7.0 der Loxone-App notwendig.
1.3. KOMPATIBLE HARDWARE VON BAUDISCH
Die in der folgenden Tabelle aufgeführten Produkte, sind ausschließlich bei der Firma Baudisch Intercom oder bei unseren Fachhandelspartnern erhältlich. Diese Produkte enthalten das Baudisch.DualCom-Feature serienmäßig ab Werk. Ohne Update können diese direkt konfiguriert werden.
| Art.-Nr:
|
Abbildung
|
Name | Beschreibung |
| individuell konfigurierbares Komplettsystem |    |
COMPLETE STEEL, alle Varianten, abgebildet sind aber nur die Vorzugsvarianten.
Mit beliebigem SIP-Türmodul. Hochwertiges modernes Design. Unsichtbare Befestigung, einfache Montage. Vandalismusschutz. |
|
33-1717R 3T Video RFID 33-1717V 3T Video 33-1717F 1T Video 33-1717B 3T 33-1717E 1T |
 |
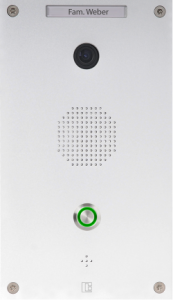
COMPACT MINI, alle Varianten.
Mit SIP-Türmodul Plus. Beste Qualität: Aufbau, Klang, Lautstärke etc. 3-fach RGB-Funktionsanzeige. Beleuchtete Schriftfelder und Edelstahlruftasten. Elektronische Sabotagedetektion. |
|
33-1486W 33-1629B |
|
COMPACT CLASSIC, alle Varianten.
Mit SIP-Türmodul Plus, mit Audio DSP zur Echounterdrückung. Mit massiver Aluminium Frontplatte. Mit integrierter IP-Videokamera 110° Weitwinkel, integrierten Zentralruftaster und Sprechmodul. COMPACTCLASSIC XL (rechts im Bild) |
| individuell konfigurierbares Modularsystem | 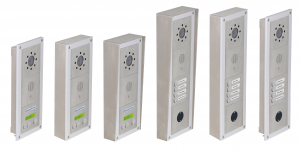 |
MODULAR STEEL, alle Varianten, abgebildet sind aber nur die Vorzugsvarianten.
Mit beliebigem SIP-Türmodul. Modulrahmen zum Einbau mehrerer Module. V4A-Frontplatten des Modulsystems sind in den Rahmen eingelassen. Wetterschutzdach aus Edelstahl passend zum Aufputzkasten. |
| 33-1384 | 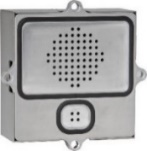 |
SIP-TÜRMODUL PLUS (OHNE FRONTPLATTE)
Komplettgerät ohne Frontplatte V4A mit Gehäuse, mit Audio DSP zur Echounterdrückung, CP-CAM Out, EasyLan, Türrelais, Lichtrelais und einem Erweiterungsanschluss. |
| 33-1000 | |
SIP-TÜRMODUL MAXI (OHNE FRONTPLATTE)
Komplettgerät ohne Frontplatte mit Gehäuse, CP-CAM Out, EasyLan, Türrelais, Lichtrelais und einem Erweiterungsanschluss. |
| 33-0999 | |
SIP-TÜRMODUL ECO (OHNE FRONTPLATTE)
Komplettgerät ohne Frontplatte mit Gehäuse und Türrelais. |
| 36-0254M | 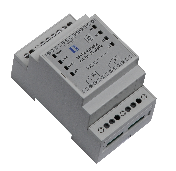 |
SIP-RELAISMODUL MAXI
Drei Eingänge, zwei Relais. Kein Audio. |
| 36-0254E | 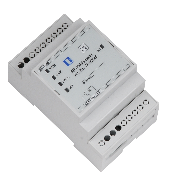 |
SIP-RELAISMODUL ECO
Ein Eingang, ein Relais. Kein Audio. |

Die SIP-Türmodule können in einer der Modular– oder Complete-Serie Sprechstelle verwendet werden. Alternativ lassen sich diese an einer benutzerdefinierten Frontplatte integrieren (z. B. als Teil eines Briefkastens aus Edelstahl).
2. KONFIGURATION DES SIP-TÜRMODULS ODER SIP-RELAISMODULS
Sie können sich mit dem Standardpasswort 1234 für Baudisch Firmware, oder admin für Loxone Firmware im Webinterface anmelden.
2.1. EINSTELLUNGEN QUICKSTART
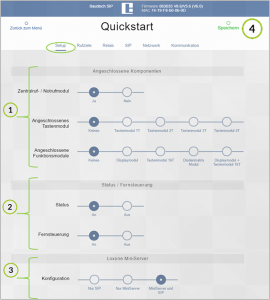
Im Webinterface des Moduls unter [Quickstart] -> [Setup] folgendes einstellen (diese Konfiguration ist über die [Experten Konfiguration] nicht erreichbar:
![]() Unter [Angeschlossene Komponenten] Ihre entsprechenden Tasten- und Funktionsmodule auswählen, dadurch werden Ihnen unter [Quickstart] -> [Rufziele] automatisch Ihre Telefonbucheinträge angezeigt.
Unter [Angeschlossene Komponenten] Ihre entsprechenden Tasten- und Funktionsmodule auswählen, dadurch werden Ihnen unter [Quickstart] -> [Rufziele] automatisch Ihre Telefonbucheinträge angezeigt.
![]() [Status] und [Fernsteuerung] aktivieren –> wird für einen späteren Funktionstest benötigt.
[Status] und [Fernsteuerung] aktivieren –> wird für einen späteren Funktionstest benötigt.
![]() Unter [Loxone MiniServer] -> [MiniServer und SIP] auswählen. Mit dieser Konfiguration wird das Baudisch.DualCom feature aktiviert.
Unter [Loxone MiniServer] -> [MiniServer und SIP] auswählen. Mit dieser Konfiguration wird das Baudisch.DualCom feature aktiviert.
![]() [Speichern] nicht vergessen!
[Speichern] nicht vergessen!
2.2. EINSTELLUNGEN RUFZIELE
Die bei 2.1. unter [Angeschlossene Komponenten] eingestellten Ruftaster, haben jeweils einen festen Telefonbucheintrag. Dieser wird nach dem Auswählen automatisch unter [Quickstart] -> [Rufziele] mit Zuordnung zum jeweiligen Modul angezeigt. Hier eine Beispielübersicht:
| Angeschlossene Komponenten
|
Zugewiesene Rufziele
|
Anschluss am Modul
|
| Zentralrufmodul | 116 | Zentralruftaste |
| Tastenmodul 1T | 2T | 3T | 4T | 101/+102/+104/+108 | Z1/+Z2/+Z3/+Z4 |
| Displaymodul | 1 bis 100 | Erweiterungsanschluss |
In diesem Beispiel wurde ein [Tastenmodul 1T] ausgewählt. Dieses zeigt automatisch den Rufzieleintrag 101 und alle dazugehörigen Einstellungen an.
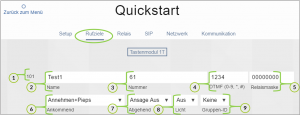
![]() Indexnummer: hier 101.
Indexnummer: hier 101.
![]() Name: frei wählbar, hier Test1.
Name: frei wählbar, hier Test1.
![]() Rufnummer: hier 61.
Rufnummer: hier 61.
![]() DTMF-Code: optional, hier 1234.
DTMF-Code: optional, hier 1234.
![]() Relaismaske: optional.
Relaismaske: optional.
![]() Verhalten für einen Ankommenden Ruf: hier Annehmen mit Signalisierung.
Verhalten für einen Ankommenden Ruf: hier Annehmen mit Signalisierung.
![]() Verhalten für einen Abgehenden Ruf: hier ohne Ansage.
Verhalten für einen Abgehenden Ruf: hier ohne Ansage.
![]() Licht: Aktivierung eines Relais mit Funktionalität Licht, hier nicht verwendet.
Licht: Aktivierung eines Relais mit Funktionalität Licht, hier nicht verwendet.
![]() Gruppen ID: optional, hier nicht verwendet.
Gruppen ID: optional, hier nicht verwendet.
2.2.1. AUSGEHENDE ANRUFE
2.2.2. ANKOMMENDE ANRUFE
Sowohl für die Kommunikation mit der Loxone-App als auch mit einem SIP-Server müssen eingehende Anrufe angenommen werden.
Jedes Rufziel hat die im Kapitel 2.2. gezeigte Einstellung für Ankommende Anrufe. Alle Anrufer ohne Telefonbucheintrag werden nach den Einstellungen des Rufzieleintrages [Unbekannter Anrufer] abgehandelt.
Für eine Freigabe der Loxone-App per Rufziel wählen Sie unter [Experten Konfiguration] -> [Rufziele] einen freien Eintrag, optimal 115 und konfigurieren Sie diesen folgendermaßen:

2.3. EINSTELLUNGEN EXPERTEN KONFIGURATION
Wechseln Sie mit [Zurück zum Menü] wieder auf die Startseite und wählen Sie die [Experten Konfiguration] aus.
Unter [Experten Konfiguration] -> [SIP] bitte folgendes durchführen:
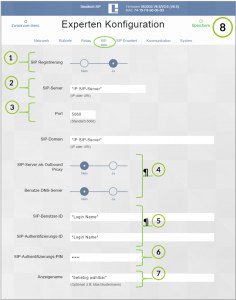
![]() [SIP Registrierung] mit [Ja] aktivieren.
[SIP Registrierung] mit [Ja] aktivieren.
![]() [SIP-Server] und [SIP-Domain] eintragen, üblicherweise identisch mit der IP der SIP-Anlage.
[SIP-Server] und [SIP-Domain] eintragen, üblicherweise identisch mit der IP der SIP-Anlage.
![]() Sicherstellen, dass der eingetragene SIP-[Port] mit dem Ihrer SIP-Anlage übereinstimmt.
Sicherstellen, dass der eingetragene SIP-[Port] mit dem Ihrer SIP-Anlage übereinstimmt.
![]() [SIP-Server als Outbound Proxy] und [Benutze DNS-Server] können im Normalfall auf [Nein] belassen werden, wenn Sie ihre SIP-Anlage nicht bewusst zur Verwendung dieser Optionen konfiguriert haben.
[SIP-Server als Outbound Proxy] und [Benutze DNS-Server] können im Normalfall auf [Nein] belassen werden, wenn Sie ihre SIP-Anlage nicht bewusst zur Verwendung dieser Optionen konfiguriert haben.
![]() [SIP-Benutzer-ID] und [SIP-Authentifizierungs-ID] sind im Normalfall mit dem Login des SIP-Accounts in ihrer SIP-Anlage identisch, falls diese nicht explizit zwischen beiden unterscheidet.
[SIP-Benutzer-ID] und [SIP-Authentifizierungs-ID] sind im Normalfall mit dem Login des SIP-Accounts in ihrer SIP-Anlage identisch, falls diese nicht explizit zwischen beiden unterscheidet.
![]() Der [SIP-Authentifizierungs-PIN] entspricht dem SIP-Passwort für den zugehörigen SIP-Account.
Der [SIP-Authentifizierungs-PIN] entspricht dem SIP-Passwort für den zugehörigen SIP-Account.
![]() Der Button [Anzeigenahme] ist frei wählbar.
Der Button [Anzeigenahme] ist frei wählbar.
![]() [Speichern] nicht vergessen.
[Speichern] nicht vergessen.
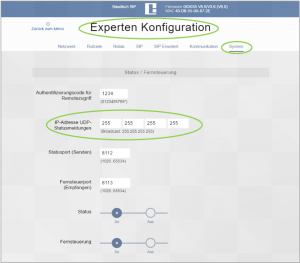
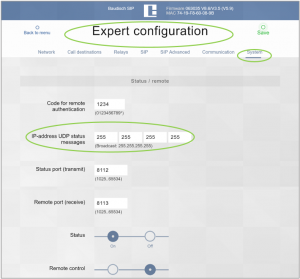
Des Weiteren muss unter [Experten Konfiguration] -> [System] die [IP-Adresse für UDP-Statusmeldungen] so eingestellt sein,
dass die Statusmeldungen den MiniServer erreichen. Optimal trägt man hier direkt die IP-Adresse des MiniServers ein.
2.3.1. SONDERFALL: EXTERNE SPRACHVERBINDUNG ÜBER DIE LOXONE APP via iptel.org oder antisip.com
Für jene Funktion ist an dieser Stelle eine SIP-Konfiguration mit den Daten eines der genannten SIP-Cloudanbieters essenziell. Entfernt man diese für eine Anbindung an der heimischen SIP-Infrastruktur (wie im Kapitel 2.3. beschrieben), ist eine externe Sprachverbindung direkt über die Loxone App nicht mehr möglich.
Dies äußert sich wie folgt
- Sprach- und Bildübertragung innerhalb der SIP-Infrastruktur sind uneingeschränkt.
- Funktionen der Loxone App lokal (z. B. im heimischen WLAN) sind uneingeschränkt.
- Funktionen der Loxone App extern (z. B. über eine mobile Datenverbindung) sind teilweise eingesschränkt.
- Bildübertragung: Uneingeschränkt
- Türöffnerfunktion: Uneingesschränkt
- Sprachverbindung: Eingeschränkt
2.3.1.1. AUFBAU EINER SPRACHVERBINDUNG ZU EINEM SICH EXTERN BEFINDLICHEN MOBILTELEFON
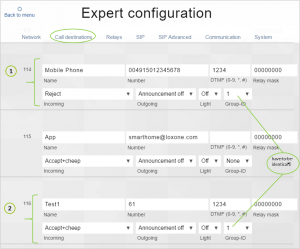
Um die zuvor (im Kapitel 2.3.1.) beschriebene Einschränkung der Sprachverbindung nach Extern zu umgehen, wählen Sie einen freien Eintrag unter den Rufzielen.
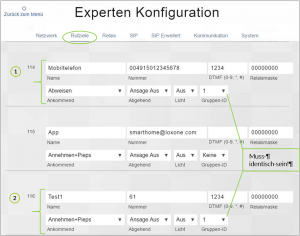
![]() Einen freien Rufzieleintrag wählen (im Bild oben war der Eintrag 114 ohne Verwendung).
Einen freien Rufzieleintrag wählen (im Bild oben war der Eintrag 114 ohne Verwendung).
[Name]: Rufzieleintrag mit dem Eintragen eines Namens aktivieren (frei wählbar). [Nummer]: Rufnummer des vorgesehenen Mobiltelefons. [DTMF]: Optionaler Code für das Aktivieren eines Relais über die Eingabe am Tastenfeld des Telefons (1 bis 4 Stellen möglich).
![]()
![]() Gruppen-ID]: Im bestehenden, zum Klilngeltaster gehörenden (hier 116) und im hier neu gewählten (114) Rufzieleintrag, muss dieselbe [Gruppen-ID] gewählt werden.
Gruppen-ID]: Im bestehenden, zum Klilngeltaster gehörenden (hier 116) und im hier neu gewählten (114) Rufzieleintrag, muss dieselbe [Gruppen-ID] gewählt werden.
Hiermit haben Sie einen Kettenruf eingerichtet (weitere Informationen und Konfigurationsmöglichkeiten zum Kettenruf finden Sie im Handbuch SIP-Türmodul unter Kapitel 6.3.6. SIP-Erweitert).
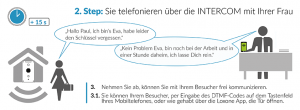
Wird nun der Ruftaster getätigt, findet die Rufvermittlung wie gewohnt statt. Bleibt ein Türruf 15 Sekunden lang unbeantwortet, wählt die Intercom, via Haustelefonanschluss, das Mobiltelefon an. Nimmt man diesen Ruf an, findet ein herkömmliches Telefongespräch zwischen Intercom und Mobiltelefon statt.
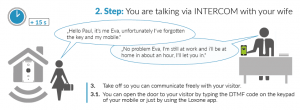
2.3.1.2. ANSCHAUUNGSBEISPIEL FÜR EINE SPRACHVERBINDUNG ZU EINEM EXTERNEN MOBILTELEFON
Wird der Türruf, innerhalb der Frist von einem anderen Teilnehmer beantwortet, bleibt der eingehende Anruf aus.
2.3.2. (OPTIONAL) KOMMUNIKATION MIT MEHREREN MINISERVERN UND / ODER PC’S
Will man mehrere Miniserver oder einen PC mit SIP-Remote Control gleichzeitig mit einer Sprechstelle verbinden, kann man einen Broadcast (Standard Einstellung) verwenden. Hierfür trägt man als [IP-Adresse für UDP-Statusmeldungen] 255.255.255.255 ein.
3. OPTIONALE KONFIGURATIOSMÖGLICHKEITEN
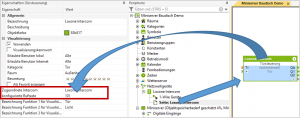
3.1. ZUORDNUNG DER RUFTASTEN MIT LOXONE CONFIG
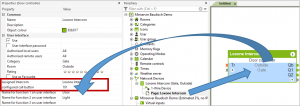
Starten Sie die Loxone Config und laden Sie Ihre Konfiguration vom MiniServer. Wählen Sie Ihren existierenden Baustein aus. Sollten Sie noch keinen [Loxone Intercom] Baustein (F5->Suche-> Loxone Intercom) in Ihrem MiniServer konfiguriert haben, finden Sie hier die Anleitung von Loxone zur Anbindung eines Intercom Moduls.
Jetzt wird der unter Kapitel 2.1. erwähnte Index der Ruftaster wichtig. Dieser muss als [konfigurierte Ruftaste] mit einem Wert von 1-116 (hier 101) entsprechend der Index Nummer des zugehörigen [Rufziels] eingetragen werden.
Um mehrere Tasten auf die gleiche App weiter zu leiten, konfiguriert man am einfachsten einen Dummy-Baustein [Loxone Intercom]. Dieser benötigt nur die interne IP-Adresse des Audiomoduls und die passende Index-Nummer, dadurch reagiert der Baustein auf den passenden Tastendruck.
Im Anschluss verbindet man lediglich den Ausgang des Dummy-Bausteins (Qb) auf den Eingang (Tr) der konfigurierten [Loxone Intercom].
3.2. TESTEN DER KONFIGURATION MIT SIP-REMOTE CONTROL
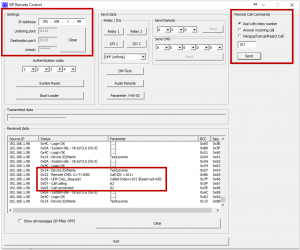
Sie können das SIP-Remote Control starten und sich die Statusmeldungen Ihres Moduls anzeigen lassen.
Sollten Sie bisher noch nicht mit unserem Tool gearbeitet haben, finden Sie dieses als kostenlosen Download hier.
Tragen Sie im Tool die IP Ihres Baudisch-Moduls ein und verwenden Sie das Passwort „Setup“ als Unlock.
Klicken Sie auf [Open] um die Verbindung herzustellen, die bisher ausgegrauten Tasten werden nun aktiviert.
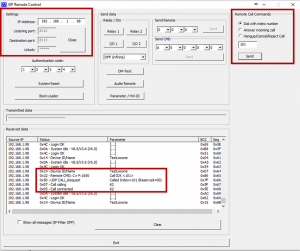
Hat sich das SIP-Remote Control mit dem Modul verbunden, kann man per Fernsteuerung rechts oben unter [Remote Call Commands] [Dial with Index Number] einen virtuellen Tastendruck für den entsprechenden Index auslösen (hier 101).
Jetzt ist es wichtig zu wissen, welche Tasten und Telefonbucheinträge verwendet werden, damit die richtige Index-Nummer getestet werden kann.
In diesem Beispiel sieht man, dass das Modul eine UDP-Statusmeldung mit der Indexnummer (101) und einen SIP-Call für Rufnummer 62 sendet. Beides läuft simultan.
Die SIP-Anlage erhält einen eingehenden Ruf und die Loxone-App die gewohnte
Push-Benachrichtigung.
3.3. FERNSTEUERN EINES BAUDISCH MODULS MIT DER LOXONE-APP
Sie haben die Möglichkeit die internen Relaiskontakte einer Baudisch-Sprechstelle über die Loxone App zu verwenden.
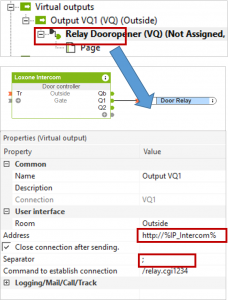
Erstellen Sie einen [Virtuellen Ausgang] und wählen Sie diesen in der [Peripherie] aus.
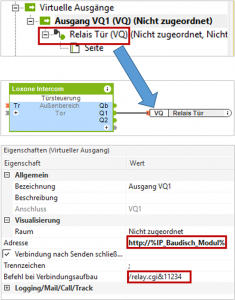
Ziehen Sie [Virtueller Ausgang Befehl] (hier Relais Tür) per drag and drop neben den [Loxone Intercom] Baustein und verbinden Sie den Türöffner Kontakt (Q1).
Wählen Sie nun den [Virtuellen Ausgang] (hier VQ1) aus.
Tragen Sie bei [Adresse] “http://“+“die IP-Adresse ihres Baudisch-Moduls“ ein.
Unter [Befehl bei Verbindungsaufbau] muss der Steuerbefehl für das Modul eingetragen werden. Dieser setzt sich folgendermaßen zusammen:
Funktion “/relay.cgi&“.
“1“ wählt das Relais aus (1 oder 2 stehen zur Auswahl).
“1234“ ist der [Authentifizierungscode für Remotezugriff], zu finden unter [Experten Konfiguration] -> [System] (Standard 1234).
Denken Sie daran die Konfiguration in Ihren Miniserver zu laden.
4. HINWEISE UND SUPPORT
Dieses Dokument berücksichtigt sowohl Baudisch- als auch Loxone-Werkseinstellungen. Darüber hinaus können wir nicht garantieren, dass ein bereits vorkonfiguriertes Gerät alle bereits eingestellten Funktionen beibehält.
5. ANHANG
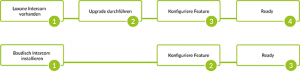
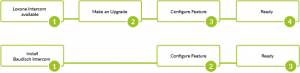
5.1. UPGRADE EINER LOXONE INTERCOM
Sollten Sie bereits eine Loxone Intercom installiert haben und das Baudisch.DualCom Feature nutzen wollen, können Sie die Standardsoftware der Loxone Intercom durch die Software von Baudisch Intercom ersetzen. Das Produkt erhält damit eine neue Firmware mit erweiterten Optionen. Die Baudisch Intercom bietet dieses Update für eine Gebühr von 149 € an.
| Art.-Nr.
|
Name
|
Beschreibung |
| 33-0667 | Software Baudisch.DualCom |
SIP-Integration für Loxone Sprechstellen. |
5.2. KOMPATIBLE HARDWARE VON LOXONE
Die in der folgenden Tabelle aufgeführten Produkte Loxone Intercom und Loxone Intercom XL sind ausschließlich über Loxone erhältlich und sofort lieferbar. Diese werden mit einem schnell zu konfigurierenden Webinterface ausgeliefert, welches die SMART HOME typischen Funktionen enthält.

Software |

SIP |

Video |
Smarthome |
|
Loxone |
– | X | X |
| Baudisch | X | X |
X |
Folgende Basismodelle sind auf den Loxone Miniserver optimiert.
Merkmale:
- Kein Türöffnerkontakt.
- Kein EasyLan-Port.
- Keine Systemanschlüsse.
- Keine zusätzlichen Tasteneingänge, nur Zentralruftaster (STANDARD) oder Matrixmodul (XL).
|
Art.-Nr. |
Name | Beschreibung |
|
Vertrieb über Loxone |
(keine internen Relais) |
| Vertrieb über Loxone oder deren Partner |
|
Full SIP & Smart Home Integration
TABLE OF CONTENT:
-
- Baudisch.DualCom SIP & Smart Home Integration
1.1. Overview – illustration of the set-up
1.2. Compatible firmware versions
1.3. Compatible Baudisch Hardware - Configuration of SIP-Door Module or SIP-Relay Module
2.1. Settings quickstart
2.2. Settings call destinations2.2.1. Outgoing calls
2.2.2. Incoming calls2.3. Settings expert configuration
2.3.1. Special case: External connection via Loxone App via iptel.org or antisip.com
2.3.1.1. Audio connection to an external mobile telephone
2.3.1.2. Example for a voice connection to an external mobile phone2.3.2. (Optional) Communication with several mini servers and/or personal computer
- Optional configuration possibilities
3.1. Classification of call buttons with Loxone Configuration
3.2. Testing the configuration with SIP-Remote Control
3.3. Remote Control of a Baudisch Module with Loxone-App
- Baudisch.DualCom SIP & Smart Home Integration
1. BAUDISCH.DUALCOM SIP & SMART HOME INTEGRATION
1.1. OVERVIEW – ILLUSTRATION OF THE SET-UP
![]() Due to our new Baudisch.DualCom Feature, it is possible to connect (incoming) door calls
Due to our new Baudisch.DualCom Feature, it is possible to connect (incoming) door calls
and video images either via (Loxone App) Loxone Miniserver or via SIP-Server (as e. g. Fritz! Box) to telephones.
![]() Intercom sends the door call to the home network. Fritz!Box and Loxone Miniserver transmit the signal and video image.
Intercom sends the door call to the home network. Fritz!Box and Loxone Miniserver transmit the signal and video image.
Incoming calls can be transmitted everywhere – no matter if connected via Loxone Miniserver or Fritz!Box.
![]() This applies to mobiles as well. An incoming door call activates in the Loxone App a video image inclusive sound.
This applies to mobiles as well. An incoming door call activates in the Loxone App a video image inclusive sound.
With the end user devices, it is possible for you to communicate with visitors or open the door by pressing a button.
![]() Our video shows you the easy way Baudisch.DualCom Feature works. Video
Our video shows you the easy way Baudisch.DualCom Feature works. Video
1.2. COMPATIBLE FIRMWARE VERSIONS
This document refers to all possible variations of SIP-Door Modules and SIP-Relay Modules as from Baudisch-Firmware V8.6/ (exact versions depend on the product). You have to update in case you have an older firmware. You can find an instruction here.
Compatible are following Versions:
- SIP- Door Module Plus firmware V8.6/3.6 Loxone Ready and higher.
- SIP- Door Module ECO / Maxi firmware V8.6/4.3 Loxone Ready and higher.
- SIP-Relay Module ECO / Maxi firmware V8.6/1.3 Loxone Ready and higher.
Moreover, it is necessary to use Loxone Miniserver Firmware 8.0.7.19 and version 7.0 of the Loxone App.
Des Weiteren ist mindestens die Loxone Miniserver Firmware 8.0.7.19 und die Version 7.0 der Loxone-App notwendig.
1.3. COMPATIBLE BAUDISCH HARDWARE
Products shown in this list can only bought at Baudisch Intercom or at specialist dealers. These products have Baudisch.DualCom Feature as standard. These can be configured directly and without an up date.
| Item Nr.
|
Figure
|
Name | Description |
| Individually configurable complete system | |
COMPLETE STEEL, alle Varianten, abgebildet sind aber nur die Vorzugsvarianten.
Mit beliebigem SIP-Türmodul. Hochwertiges modernes Design. Unsichtbare Befestigung, einfache Montage. Vandalismusschutz. |
|
33-1717R 3T Video RFID 33-1717V 3T Video 33-1717F 1T Video 33-1717B 3T 33-1717E 1T |
|
COMPACT MINI, all variants.
With SIP-Door Module Plus. Best quality: design, sound, volume etc. 3 x RGB function display. Illuminated title blocks and stainless-steel call buttons. Electronic sabotage detection. |
|
33-1486W 33-1629B |
|
COMPACT CLASSIC, all variants.
With SIP-Dore Module Plus, with Audio DSP for echo cancellation. With solid aluminum front panel. Integrated IP Video Camera 110° wide angle, Integrated Central Call Button and Intercom Module. COMPACT CLASSIC XL (right figure) |
| Individually configurable modular system | |
MODULAR STEEL, all variants, but only the preferred variants are shown.
With any SIP-Door Module. Module frames for any modules of the Baudisch Module System. V4A front panels of the module system are embedded in the frame. Weather protection cover (stainless-steel)-compatible to on-wall housing. |
| 33-1384 | |
SIP-DOOR MODUE PLUS (without front panel) Complete functional unit without front panel, with housing, with Audio DSP for echo cancellation, CP-CAM Out, EasyLan, door relay, light relay and extension port. |
| 33-1000 | |
SIP-DOOR MODULE MAXI (without front panel)
Complete functional unit without front panel, with housing, CP-CAM Out, EasyLan, Door Relay, light relay and an extension port. |
| 33-0999 | |
SIP-DOOR MODULE ECO (without front panel)
Complete functional unit without front panel, with housing and Door Relay. |
| 36-0254M | |
SIP-RELAY MODULE MAXI
Three inputs, two relays and no audio. |
| 36-0254E | |
SIP-RELAY MODULE ECO
No inputs, one relay and no audio. |
All SIP-Door Modules can be integrated in our Modular– or Complete– series. As an alternative, it can be integrated in an user-defined front. (e. g. as part of a letterbox made of stainless steel).
2. CONFIGURATION OF SIP-DOOR MODULE OR SIP-RELAY MODULE
You can register with Baudisch firmware using standard keyword 1234 or admin with Loxone firmware.
2.1. SETTINGS QUICKSTART
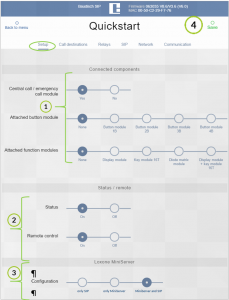
Make following setting in the webinterface [Quickstart] -> [Setup]:
![]() Choose button or function module using [Connected components] – then entries of the telephone will be shown by [Quickstart] –> [Call destination] automatically.
Choose button or function module using [Connected components] – then entries of the telephone will be shown by [Quickstart] –> [Call destination] automatically.
![]() Activate [Status] and [Remote control] –> it is required for a later functional test.
Activate [Status] and [Remote control] –> it is required for a later functional test.
![]() Activate [Loxone MiniServer] and then the task -> [MiniServer and SIP].
Activate [Loxone MiniServer] and then the task -> [MiniServer and SIP].
![]() Don’t forget to [Save]!
Don’t forget to [Save]!
2.2. SETTINGS CALLDESTINATIONS
The preset Call buttons which – see chapter 2.1. – have a fixed entry in the telephone book. It is shown automatically when chosen [Quickstart] -> [Rufziele] with direct connection to the module. Following a general view:
| Connected Components
|
Confirmed Call Destinations
|
Connection to the Module
|
| Central Emergency Button | 116 | Central Emergency Button |
| Button Module 1B | 2B | 3B | 4B | 101/+102/+104/+108 | Z1/+Z2/+Z3/+Z4 |
| Display Module | 1 to 100 | Extension Interface |
Here a [Button Module 1B] is chosen. It shows automatically phone number 101 with all corresponding settings.
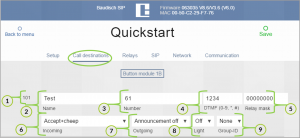
![]() Index number: Here 101.
Index number: Here 101.
![]() Name: Free selectable, here Test.
Name: Free selectable, here Test.
![]() Number: Here 61.
Number: Here 61.
![]() DTMF code: Optional, here 1234.
DTMF code: Optional, here 1234.
![]() Relay mask: Optional.
Relay mask: Optional.
![]() Incoming call: Answer with signal.
Incoming call: Answer with signal.
![]() Outgoing call: Here without announcement.
Outgoing call: Here without announcement.
![]() Light: Activating a relay with its function: light – not in use.
Light: Activating a relay with its function: light – not in use.
![]() Group-ID: Optional, here not in use.
Group-ID: Optional, here not in use.
2.2.1. OUTGOING CALLS
2.2.2. INCOMMING CALLS
Incoming calls have to be answered via Loxone App or SIP server. Each number called has default settings for incoming calls – see chapter 2.2. All callers without entry in the telephone book are handled according to the settings of the entry of the telephone book – [Unknown caller].
To give allowance to Loxone App via call destination please choose [Expert Configuration] -> [Call Destination] a free entry. It is optimal to use 115 and to configure as follows:

2.3. SETTINGS EXPERT CONFIGURATION
Change with [Back to menu] to the homepage and choose [Expert configuration].
Under [Expert configuration] -> [SIP] please do following:
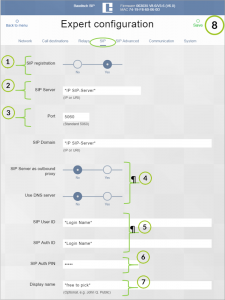
![]() Accept [SIP registration] with [Yes].
Accept [SIP registration] with [Yes].
![]() Enter [SIP Server] and [SIP Domain] it is normally identical to the IP of the SIP.
Enter [SIP Server] and [SIP Domain] it is normally identical to the IP of the SIP.
![]() Be sure that the registered SIP [Port] corresponds to the IP of the SIP.
Be sure that the registered SIP [Port] corresponds to the IP of the SIP.
![]() [SIP Server as outbound Proxy] and [Use DNS server] can normally be set on [No] – in case you didn’t choose this option for your SIP system.
[SIP Server as outbound Proxy] and [Use DNS server] can normally be set on [No] – in case you didn’t choose this option for your SIP system.
![]() [SIP User ID] and [SIP Auth ID] are normally identical – in case you don´t differ between it.
[SIP User ID] and [SIP Auth ID] are normally identical – in case you don´t differ between it.
![]() [SIP Auth PIN] corresponds to the SIP keyword of the SIP-account.
[SIP Auth PIN] corresponds to the SIP keyword of the SIP-account.
![]() The button [Display name] is arbitrary.
The button [Display name] is arbitrary.
![]() [Save] don’t forget to save.
[Save] don’t forget to save.
Moreover – on the page [Expert configuration] -> [System] the [IP-address UDP status messages] has to be set the way status messages will arrive at the mini server. Best is to enter the IP-address of the mini server:
2.3.1. SPECIAL CASE: EXTERNAL CONNECTION VIA LOXONE APP VIA iptel.org or antisip.com
A SIP configuration with data of one of the SIP cloud providers is essential for each function. An external audio connection via Loxone App is no longer possible in case this SIP configuration is erased – see chapter 2.3.
Effects:
- No restrictions for voice and image transmission within SIP infrastructure.
- Functions of Loxone app local (e. g. local WLAN) are unrestricted.
- Functions of Loxone App external (e. g. via mobile data connection) are partly restricted.
- No restrictions for images.
- No restrictions to open doors.
- No restrictions for audio connection.
2.3.1.1. AUDIO CONNECTION TO AN EXTERNAL MOBILE TELEPHONE
Please configure as follows to avoid a restriction of the audio connection.
![]() Choose a free call destination. [Name]: Activate the (telephone number) entry with entering the name (free selectable).
Choose a free call destination. [Name]: Activate the (telephone number) entry with entering the name (free selectable).
[Number]: Phone number of the planned mobile. [DTMF]: Enter number on the telephone keypad (1 to 4 numbers are possible) for activating a relay with an optional code.
![]()
![]() [Group ID]: The same ID as the (telephone number) entry of the button pressed – see example 116
[Group ID]: The same ID as the (telephone number) entry of the button pressed – see example 116
If you press the call button – it connects as usual. In case, there is no answer for about 15 seconds – Intercom calls via internal telephone system the mobile phone. If you answer this call – it will be a conventional call between Intercom and mobile.
2.3.1.2. EXAMPLE FOR A VOICE CONNECTION TO AN EXTERNAL MOBILE PHONE

In case a door call is answered within 15 seconds then the incoming call is cancelled.
2.3.2. (OPTIONAL) COMMUNIKATION WITH SEVERAL MINI SERVERS AND / OR COMPUTERS
You can use a broadcast (standard setting) to connect several mini servers or a personal computer with SIP Remote Control. Choose/Enter [IP address UDP status messages] 255.255.255.255.
3. OPTIONAL CONFIGURATION POSSIBILITIES
3.1. CLASSIFICATION OF CALL BUTTONS WITH LOXONE CONFIGURATION
Start Loxone Configuration and load your configuration from mini server. Choose an existing component. If there is not yet configured a [Loxone Intercom] component (F5->Surch-> Loxone Intercom) in your mini server, find here the instruction.
Now the index of the ringing key is important – see chapter 2.1. It has to be configured as [configured call button] with 1-116 (here 101) according to the index nr of the [call destination].
You have to configure a dummy – component [Loxone Intercom] to transfer several buttons to the same app.
This component only needs the internal IP address of the audio module and the relevant index number, then the component acts on the relevant keypress.
Then only the output of the dummy component (Qb) has to be connected to the input (TR) of the configured [Loxone Intercom].
3.2. TESTING THE CONFIGURATION WITH SIP-REMOTE CONTROL
Start SIP Remote Control and look at the status messages of the module. Didn´t you work with our tool up to now – please find it here as free download.
Please enter the IP of your Baudisch Module and use the keyword „Setup“ to unlock. Click on [open] to get a connection – grey buttons will be activated..
In case SIP Remote Control is connected with the module – it is possible to create a virtual keypress for the relevant index. Just choose via remote control [Remote Call Commands] [Dial with index number] on the right upper side (here 101).
Now it is important to know which button and entries are used, so that the correct index number can be tested.
Here you can see that the module sends an UDP status with index number (101) and a SIP call for Nr. 62. It works simultaneously.
SIP center gets an incoming call and the Loxone App a push notice.
3.3. REMOTE CONTROL OF A BAUDISCH MODULE WITH LOXONE-APP
It is possible to use internal relay contacts of a Baudisch Intercom via Loxone App. Please use [Virtual outputs] and choose it in the [peripherie].
Drag [Virtual outputs] here [Relay Dooropener] per drag and drop next to [Loxone Intercom] and connect with the [door controller] [Q1].
Choose [Virtual outputs] here [VQ1].
Afterwards enter [Adress] “http://“ + “IP-Adress of your Baudisch Module“.
Behind [Command to establish connection] the control impulse for the module has to be entered. It is structured as follows:
Function “/relay.cgi&“.
„1“ chooses the relay (1 or 2), „1234„ is the [keyword for remote control] -> please find under [Expert Configuration] ->[system] (Standard 1234).
Don´t forget to download the configuration to your mini server.
4. NOTICE AND SUPPORT
In this document Baudisch and Loxone factory settings are considered. Moreover, we can´t guarantee that a system with existing configuration has all functions.
5. ATTACHMENT
5.1. UPGRADE OF A LOXONE INTERCOM
Do you already have an installation with Loxone Intercom and do you want to use Baudisch.DualCom Feature – you can replace the standard software of Loxone Intercom by software of Baudisch Intercom. Then the product gets a new firmware with additional options. Baudisch Intercom offers this upgrade for a fee of 149 €.
OVERVIEW BAUDISCH.DUALCOM
| Item Nr.
|
Name
|
Description |
| 33-0667 | Software Baudisch.DualCom |
SIP-Integration for Loxone Intercom. |
5.2. COMPATIBLE HARDWARE OF LOXONE
Products shown in this chart can solely be get via Loxone and are on stock. You get them with a webinterface which is easy to handle and which has typical functions of smart home.
|
Software |
SIP |
Video |
Smarthome |
|
Loxone |
– | X | X |
| Baudisch | X | X |
X |
Features:
- No door opener.
- No EasyLan port.
- No system connection.
- No additional button – only central button (STANDART) or matrix module (XL).
|
Item Nr. |
Name | Description |
|
Distribution via Loxone or their partners |
(no internal Relay) |
| Distribution via Loxone or their partners |
|